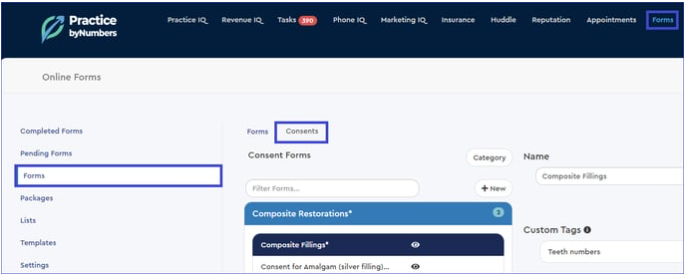
Accessing Consent Forms
- Log in to PbN, then go to the Forms tab at the top of the screen.
- On the left-hand menu, click on Forms and then select Consents on the right side.
Creating and Customizing Consent Forms
1. Creating a New Consent Form:
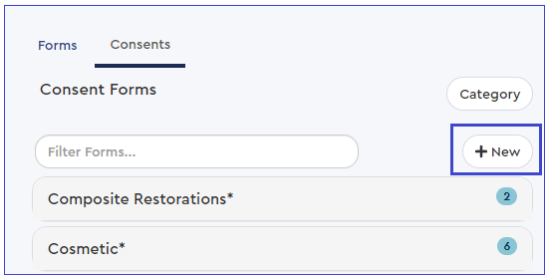
- In the Consents section, you will see a list of available categories and consent forms.
- To create a new form, click the +New button.
2. Naming and Categorizing:
- Start by giving your new form a name and selecting the appropriate category.

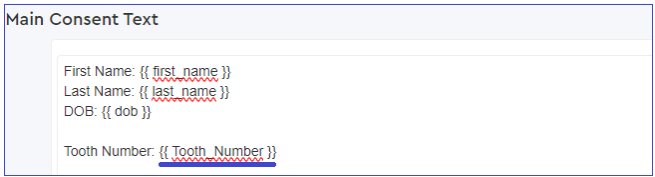
3. Adding Main Consent Text:
- In the Main Consent Text field, you can either type or paste the content of your consent form.
- If you're pasting from a Word document, the formatting typically transfers smoothly. Basic formatting options, such as font adjustments, bolding, and lists, are available.
- Note: When patients receive the consent form, they will only be able to agree and sign. They cannot add any custom information—similar to a read-only PDF file.

4. Setting Up Confirmation Text:
- Below the main text field, you'll find the Confirmation Text section. This is the message that patients will see when they check the box to agree to the consent.

Placeholders and Custom Tags
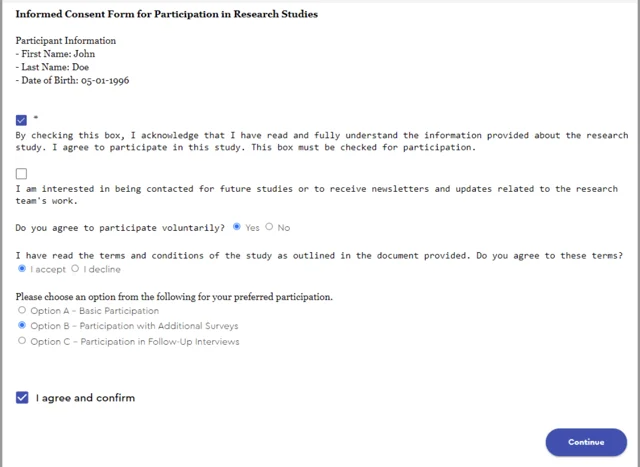
1. Using Placeholders:
- The Insert Placeholders option allows you to include pre-populated information, such as the patient’s name, date of birth, or practice details.
- Placeholders appear within symbols (e.g., [[Patient_Name]]), and when the form is sent, it will automatically populate with the patient's information.
- This feature also allows you to insert patient initial fields within the text, providing a more personalized experience.


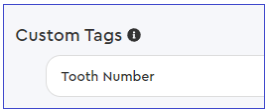
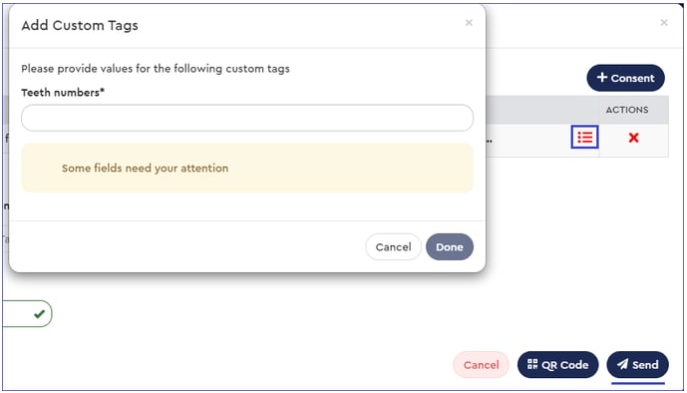
2. Creating Custom Tags:
Similar to placeholders, Custom Tags allow you to add specific information before sending the consent form.
For example, to create a field for a tooth number, use tags like
{{Tooth_Number}}.Custom tags will be detected and listed above the text box, ensuring they are correctly set up.
When you send a consent form that includes a custom tag, you’ll be prompted to enter the relevant information before sending it to the patient.
Optional or Elective Checkboxes in Consents
- You can include optional checkboxes in your consent forms, allowing patients to decline certain aspects of the form.
- Use custom tags like
((yes_no))or((accept_decline))to display radio buttons for opting in or out. - To make a checkbox optional, add an asterisk to the existing checkbox control like this:
[[*]]. If you want the checkbox to remain mandatory, use[[ ]]. - You can introduce additional brackets for the same checkbox if needed.
- Radio buttons under labels like
((group_name, radio text))allow you to present multiple options for patients to choose from, making it a required field with only one selection allowed per group.

Advanced Customization Options
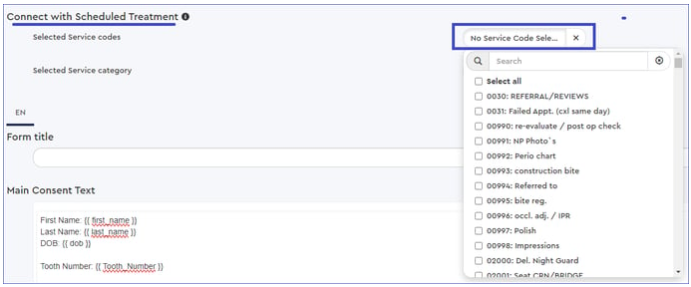
1. Connecting Consent Forms with Scheduled Treatments:
- After creating your consent form, you can connect it to specific service codes to automatically prompt the form during scheduling.
- This feature ensures that the correct consent forms are selected based on the patient's scheduled services.
- However, note that in most states, consent forms must be completed in the presence of the doctor, so this feature does not automatically send the consent forms.
2. Staff Signature Settings:
- By default, consent forms do not require signatures from doctors or witnesses. However, depending on your state’s laws, you may want to enable this feature.
- You can activate the signature requirement by checking the appropriate boxes. Once enabled, the option for the doctor or witness to sign will appear after the patient has signed the form.
- If the patient uses their own device, the consent form will be added to the Action Center on the PbN Home page for later completion.
- To sign, navigate to Forms and then Completed Forms on the left. Recently submitted forms will appear here with the option to add staff signatures.

Attachments (11)


Was this article helpful?
That’s Great!
Thank you for your feedback
Sorry! We couldn't be helpful
Thank you for your feedback
Feedback sent
We appreciate your effort and will try to fix the article